Design Teams

Sunday, December 29, 2013

Chocolate, Coffee & Card Challenges #55 New Beginnings

Well, Christmas is over and 2014 is nearly here.  A new year brings so many new beginnings, and that is what we would like to celebrate for our last challenge of 2013.  It could be the new year itself, a new baby, a wedding, and engagement, retirement; anything that starts a new adventure in your life.

Our sponsor Milk Coffee graciously gave each of us at CC&CC a choice of image to use for this fun challenge.  My image is called "Senior Couple", and I used it to make a retirement card.


So come join in the fun and share your new beginning for 2014 with us!

HAPPY NEW YEAR!

Saturday, December 14, 2013

Chocolate, Coffee & Cards Challenges #54 ~ Happy Holidays

Tis the holiday season and we are ready to celebrate at CC&CC!  We would love to have you join us for our theme of "Happy Holidays" being sponsored by the fab Eureka Stamps.

http://www.eurekastamps.com/categories.php?cat=Digi-Stamps

Our super design team has some beautiful inspiration for you, so be sure to take a peek!

The digi I have used is called "Three Kings".  I embossed a silver background, colored my digi with Copic's, then cut it out and mounted it on top of a lovely die cut star design.  There are also quite a few tiny rhinestones on the kings, but they are hard to see in the photo.


Happy Holidays Everyone!!


Saturday, November 30, 2013

Dreamtime Design Craft Challenges

Welcome to our Dreamtime Design Craft Challenge for December!  We sure hope you enjoy this one.  Our theme is "Christmas ~ Use a New Technique".

When I first started to really think about something new I would like to do, I was at a loss.  So, I hopped on the internet and started checking out all kinds of crafts and techniques.  At first I thought maybe I would do a gingerbread house, as I had never done one.  But in the process of looking at designs and instructions to make one, I came across this technique!  It is designing with frosting!  Yes, Frosting!  Royal frosting made with meringue powder and powdered sugar.  The results were amazing!  When I saw this picture of a church made with it I was sold:


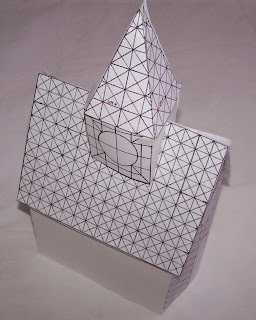
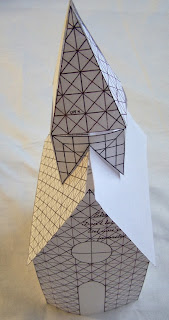
The first thing I did was print out the pattern for all of the pieces I planed to make; roof, steeple, cross, 2 sides, front & back, and trees.


Then I cut all the pieces out of paper and assembled them to make a model and be sure all the pieces fit and were of the right size ~ they were!


I got all the supplies I needed to make the church:

The recipe for the frosting
Disposable Plastic Decorating Bags
#3 Frosting Tip & Screw Tops To Hold The Tip To Bag
Cardboard Pieces
Wax Paper & Tape
Printed Pattern Pieces
LOTS OF PATIENCE!!!

First tape you pattern pieces to the cardboard for stability and cover with wax paper.  Be sure it is secured snugly.  Make your frosting and put it in the assembled decorating bag.  Start squeezing the bag to get a nice flow and cover every line of your pattern pieces.


I designed the stain glass windows from examples give in pictures:


After you have done your pieces make sure you let them dry for at least 24 hrs.  I then used a large, thin spatula to gently insert under the pieces to lift them off of the wax paper.  Work VERY slowly, don't rush it!  It is very, very delicate!  There will be breakage, but they can be done again.  It is time consuming but not difficult!

Now it is time to assemble the pieces.  Patience is your best friend, lol.  You "glue" all of the pieces together with more frosting and let dry.  I added tissue paper to the inside of my stained glass windows for some color.


I then made a base to sit the church on from foam board and covered it with aluminum foil.  I cut a hole in the middle to put a candle in so the church would glow from within!  I sprayed it all with fake snow.  Next I needed to put on the roof and the steeple.  Time to sit the church upright and begin.


 Oh so VERY gently I put it on the base.  I started to glue on the roof pieces.  One went on very well, the other would not quit slipping down.  I decided to tilt it to more of a flat angel so it wouldn't slip so much.  Then the WORST that could happen DID!


WAAAAAAHHHHHHHH!

Oh well, doodoo happens, lol!  I have to tell you I was a bit upset, only because I was so looking forward to the final result.  But you know, these are the things that can happen when you try a new technique!  Practice, practice and MORE practice, lol!  I learned a LOT on what to do and NOT to do.  The most important thing is DO NOT RUSH what you are doing, and you have to have the lightest angels touch when handling your pieces!  GO SLOW and GENTLY!  I will do it again, but will do it on a smaller scale.  Large pieces are VERY hard to work with as they are sooooooo delicate!

Here are a couple of the trees that were going to be placed around the church, they survived, LOL!  I would love to do a few little houses and the church and make it like a village.....  Some day!


To sum it all up, I will say I VERY much enjoyed the project even though it ended in catastrophe!  When doing a new technique it is a LEARNING experience, and I learned a lot!  So, goal completed!

HAPPY CRAFTING!!!


Sunday, November 24, 2013

Chocolate, Coffee & Cards Challenge #53 So Grateful

I apologize for this post being late.  But, you know how life goes along and all is well, and then it just explodes, lol!  Well, this past week that's what it it for me.  Thankfully I think all is under control again, but it sure messed up my crafting time!

On to our great current challenge at CC&CC!  What are YOU grateful for?  I'm sure there are many things in your life you are blessed with.  Now is your chance to express it in a card!

Our super sponsor is Stamp Fairy.  Such adorable images they have!  The one I am using is called Molly Throughout The Year - May, and she sure is a cutie!  I did a double gate fold card to show her off!


We sure would love to have you join us at CC&CC and see what you are thankful for!
Have a GREAT Thanksgiving!!!


Friday, November 8, 2013

Chocolate, Coffee & Cards Challenge #52 Monochromatic and Great News!

Can you believe we are into November already?!!  I swear, the older I get the faster time goes by.  So I guess I better get right down to business!

First I want to announce that CC&CC has THREE NEW DT MEMBERS!  We are so happy to welcome Cindy, Mikha and Samantha to our team.  Be sure to stop by and meet them!  And while you are there take a look at the great cards all of our DT have done for you.  Join in the fun and play along with us!

For our first challenge in November CC&CC is doing a monochromatic theme.  I like doing these, but sometimes they me think a bit harder.  Our lovely digi images were provided by our sponsor Robyn's Fetish, and the one I chose is called "Cornucopia" and is perfect for Thanksgiving.  Now usually when I look at an image like this one, I imagine it colored with lovely Autumn colors.  But for this challenge I couldn't do that.  So on went the thinking cap!  I decided on brown as my basic color.  Burlap and jute are really a hot item right now, and I just happened to have purchased some!  It looked perfect with the shades of brown.  I attached a burlap flower and added a gold turkey charm, then wove some dark brown ribbon through the burlap piece.  The image is printed directly on to the patterned paper and then run through my Cutlebug with a die for the shape.  The sentiment was a small stamp I had in my stash.


I am very pleased with the result, and want to do some more Thanksgiving cards with the burlap.  I really like the texture and the way it looks.

One of our DT members has been ill and could not complete her card.  So I used the digi assigned to her and made a second card with the image.  The digi is called "Welcome Fall Turkey".


Be sure to come over to CC&CC and show us your monochromatic creation, and maybe win some great digis of your choice from Roby's Fetish!  And while you are there grab our blinkie for on your sidebar!

Thursday, October 31, 2013

Dreamtime Designs Craft Challenge #2


Hello and welcome to the second craft challenge over at DDCC!  We are doing a great craft challenge this month that will be something you can use time and time again.  How about making your own "Light  Box" for taking pictures of your great creations!  There are many variations and designs for making one.  I researched a lot of designs on the web before doing mine.  For me, the main challenge was to make one that did not take up a lot of space.  I am living with my Dad and caring for him and my space is VERY limited.  I have NO PLACE to store a full light box.  So I decided to design one that collapses and can be put behind my dresser!  Here is how I did it:

Supplies 
Cardboard Box
 Old White Sheet
Sheet of White Poster Paper 22"x28"
Scissors
Ruler
Pencil
Sharp Knife
Tape


1)  Cut all top flaps from box                          


2) Cut at seams on three sides and cut off ONE top piece and save for later


3) On the two side flaps and saved piece, cut a "window" 2" in from each side


4) Cut three pieces of sheet one inch larger on each side than each window


5) Start with removed window piece.  Lay sheet piece flat, center window piece on top


6)  Cut diagonal slit at each corner for easy folding at corners


7)  Starting at bottom, pull up all edges of sheet and tape to the cardboard window.  Proceed to each side of window making sure your sheet is tight and tape to cardboard piece.


 Turned over it will look like this!


8)  Repeat this process on the two other sides making sure smooth finished side is to the INSIDE!


9)  Cut your poster paper the width of the inside of the box and insert into the inside of the box so that it is slightly curved - DO NOT CREASE in the back!


10)  Lay your top window piece across the top and 
you have the finished box!


To put it all away I removed the top and the poster paper, folded up the bottom, and then the sides inward.  I put all the pieces in a pile and it slides in behind my dresser!   So, VOILA, a collapsible light box!  It's not even two inches thick! 


To light my box I used my desk lamp.  I am taking my pictures inside, so I sat the box on top of my high dresser and put the lamp on the side.  I think having two lamps would be better, but I used what I had.


NOW FOR THE RESULTS!  
First I must tell you that I usually take pictures of my cards in my bedroom. I am lucky as there is a LOT of natural light in the room.
This first pic is IN THE LIGHT BOX.


My usual place:

It was a super project!  And I think for most people the light box would be the best option.  But for me, where I am now, I think I prefer my pics without the box.  Some day when I have my craft room back and have the room to set up the box permanently and use two lights, I think the results will be much better.

Jump on over to DDCC to see the other great light boxes the gals have made and see their results.  I think you will find it quite interesting!  Each of us had a great time doing this project.  Try one and see how it works out for you.  It is simple and didn't even take me an hour to complete!

Friday, October 25, 2013

Chocolate, Coffee & Cards Challenges #51

Hello everyone!  Time for another fun challenge at CC&CC.  We are celebrating the little things - Bugs and Little Critters!  That means things like ants, mice, bees, ladybugs, snails, etc.  But NOT little animals.  Our great sponsor is QKR Stampede, and they have the perfect images for this theme!  Be sure to check out their great variety of digis and rubber stamps! 

I've used this cute image supplied by QKR called "Dancing Ladybugs".  It is so adorable and was so fun to color!  I used my Copics, added a few buttons and the ticket sentiment.  I have to tell you that this super layout came from a great gal named Tammy.  I love her designs, and this was one of hers.  Drop by her blog and prepare to be inspired!


SO, what is your favorite little critter!?!  Be sure to show us at CC&CC!

Tuesday, October 22, 2013

Time for Halloween!

I know I've said before that Autumn is my favorite season, but it is!  I love decorating and making cards for friends for Halloween and Thanksgiving.  Here are a few Halloween cards that I have done for this year.


Hope you are have as much fun as I did doing your Halloween cards!

Friday, October 11, 2013

Chocolate Coffee & Cards Challenge #50

It's my favorite time of year, Autumn.  The leaves changing colors are so beautiful to see.  I must admit that it really hasn't started much here in Phoenix, but up north it has.  And that is where my sweetie and I are headed for a week.  Up to our fave place in Pinetop.  Walks in the pines, crispy cool weather and long talks by a lovely fire with a glass of wine, perfection!

ANYHOW, our theme for CC&CC is Autumn ~ NOT Halloween.  We want to celebrate this beautiful season and all its splendor!  And to help us along, we have 2 great sponsors which means 2 chances to win a fab prize!  The first is Bugaboo Stamps, (my fave) who will giving a lucky winner 7 free digis, and The Robin's Nest who will award a $10 gift certificate to use for crafting goodies in their store, nice!

On my card I used this sweet image called "Jar Autumn".  I kept it in more of the clean and simple design to really showcase the image.  I colored it with my Copics and added the sentiment from a stamp that I had and the little leaf brad for just a touch of sparkle.


We would love to have you join us for this fun challenge.  Our DT have done some lovely cards for you inspiration too.  Be sure to check them out and also take a look at the other great images they used!  Have fun and Happy Autumn!