Design Teams

Thursday, March 17, 2011

SPRING!

It's hard to believe, but Easter is just right around the corner!  I really enjoy making cards for this holiday, I love the beautiful spring colors, pastels and sunny yellows.  Lots of flowers and bunnies, fun!  This card is a take of the one that was on the cover of Card Maker Magazine last month.  I fell in love with it as soon as I saw it.  I really enjoy working with the Flower Soft product and don't use it as much as I should.  (So many supplies to choose from and things get forgotten!)  This got me working with it again.  The stamp is from a set by The Kitchen Sink that you do in layers.  I didn't do that for this tree, but I sure had fun doing them for Autumn cards.  I stamped the basic tree, sponged on the light pink background, drew extra branches to show through the tree foliage, then applied the Flower Soft.  The white edges are torn and a tiny bit distressed.  I used a little color from my Copics on the base of the tree and the sentiment.  Of course I had to add a pretty bow!


Saturday, March 12, 2011

TSUNAMI ON MY BELOVED BIG ISLAND

My heart aches for my beloved Big Island.  I am so thankful that all my friends and loved ones are safe, but there is a lot of damage and a lot of people are suffering from it.  I pray for them and hope that they will recover from their loses soon.  It will take determination and faith.  To those in Japan, I can't even imagine your loss and suffering.  God Bless you all.


Alii Drive damage to street


Water coming over the sea wall on Alii, the peir is under water, it has been condemned.


When the surge pulled back out..


All that's left of the beautiful koa wood restaurant and bar at the Kona Inn


The ocean front restaurant at The King Kamehameha - 
They just completed a total renovation 7 months ago of the whole hotel.  The ground level of the hotel is destroyed.  It's a landmark in Kona and is a true symbol of the ALOHA of our island, now this...


House floating in Keahou Bay


Car and rubbish strewn on shore in Keahou Bay


If you want to really see how it was in Kona along Alii Drive, watch this video.  A tourist from England took it - he was NUTS to be out there, but it is amazing footage.  The wall that the water is pouring over is about 8 feet down to the normal water level on the other side.  It was level to the top and pouring over, no wonder the pier is under water.
Video
 I know that our loss and damages in NO WAY compare to those of Japan, but this is my home and it is so personal

Thursday, March 10, 2011

COLOUR CHALLENGE - cdaccc19

Aloha everyone, it was a good day for doing a card just for fun!  It's been quite a while since I was able to do that.  I decided to get some inspiration by joining a challenge.  This was really a FUN one!  It's being hosted by Crafty Ann's over at Crafter's Digital Art Center, such a GREAT site, and it's free to join!  It's always full of super info and ideas.  The theme was to use the free digi stamp, which are these adorable lanterns (you know how I love things with an Asian flare!), and the colors of purple, lilac and pink.  I sponged the pink edges of my base card and also the background on which I used my own stamp of the tree branch.  I printed the lanterns, colored them with my Copics, cut them out and raised them with pop-dots for depth.  I added the fringes of thread and hung them onto my branch.  The flowered paper is a beautiful piece that is Japanese rice paper I bought in Hilo ages ago.  It has such a lovely texture and I really like the gold metallic mixed in.  All the colors blended together very well!  For a final touch I added the ribbon and hung the coin from the bow.


Sunday, March 6, 2011

"DUCKY" AND GOOD NEWS

Aloha all!  At last things are getting back to almost normal.  My Dad came home yesterday from rehab and is a very happy guy!  It was a long month for both of us, but things are getting better.  I hope to be able to have more time soon to catch up with all of you, I miss you!

I finally had a bit of time to make a birthday card for my BFF in Hawaii, Missy B!  She loves ducks and champagne, so when I saw this stamp by Whiff Of Joy I KNEW it was for her!  (There is a baby duck on this stamp but I masked it out).  The image was colored with my Copics and also a gold pen for the label on the bottle.  I  used my Nestabilites scallop circle for the back part of the circle and added some very small rhinestones for her necklace, so "girly"!


Saturday, February 19, 2011

MY DAD

Hello to all of my friends and followers.  I wanted to let you all know that I am sorry I haven't been by lately to see your beautiful creations.  My Dad was in the hospital for 13 days and is now in a rehab facility getting physical therapy so he can get strong enough to get in and out of his wheel chair on his own.  Until he can, he can't return home.  He is making progress every day and is so anxious to get out of there!  I have been spending a LOT of time there with him and haven't had the time for much else.  I hope I will be able to visit you all again real soon!  Aloha nui, Joanne.

Sunday, February 13, 2011

QUITE THE PEAR

Happy Valentine's Day everyone!  These two cards are the same but with a different color scheme.  I think I like the green one more than the traditional red.  The stamp is just too cute and is another I bought from the dollar bin at Micheal's.  I sure do find some fun stamps there!  I used my eyelets with the ribbon, added a touch of glitz with tiny green rhinestone for a dot on the "i", and put on the little heart.


On the second one I again used the eyelets with the ribbon (love those polka dots!) and added some Stickles on the heart for a bit of sparkle.


Tuesday, February 8, 2011

DANCE IN THE RAIN

We all have times in our lives that are challenging.  A dear friend of mine is going through such a time right now, and is on her way to a wonderful new chapter in her life. She is such an upbeat person that when I made this card for her I knew I had to use the this stamp on the front.  The inside verse is one we sing at the end of our Yoga class and it was perfect!  I got the papers on sale at Micheal's, I loved their funky look and colors.


Thursday, February 3, 2011

FRIENDS FOREVER VALENTINE

It's been a very hectic and stressful day.  I had to take my Dad to the emergency room at 4 this afternoon and I just got home - it's after midnight.  They kept him over night as they are not sure what his problem is and they are running test and he'll be seeing a specialist tomorrow.  You may wonder why I am on here posting at this time of the morning, well I needed something to take my mind off of things and calm down.  I'm sipping a coup of tea and trying to relax and not worry.  Hopefully this will get my mind off things for a while.

I did this card yesterday and I really like it.  I think it's the pretty pink bow!  I love to see them on cards, so feminine and soft.


Wednesday, February 2, 2011

UNDER THE SEA

I can finally post this card!  I made it for my daughter's birthday and had to wait until she received it!  This one was so much fun to make and I went a bit overboard I think, lol!  I colored the mermaid ages ago with my Prisma colored pencils and Gamsol, then added some glitter to her bottom body and her starfish, but it's hard to see it in the picture.  The oval was cut with my Nestabilities and I sponged the edges with ink.  The wave was cut with my Cricut from the Life Is A Beach cartridge.  The "coral" is from some stash I found in my Mom's old pile of craft stuff.  It's plastic coated with glitter, weird stuff but perfect for what I used it for.  I added the gold charms, ric-rac and the pearl as a finishing touch.  Glad to say she loved it!


Tuesday, February 1, 2011

TEA TIME THANK YOU

My cousin in PA surprised me with a special gift.  She made kerchief angels from hankies that had been our grandmother's.  So of course I wanted to send a special thank you.  I really like this stamp by Stampin' Up and it was perfect for her.  I colored it with my Copic's, inked the edges of the circle cut with my Nestabilites, added the bow and the teacup charm.  The patterned paper is from a stack by DCWV called Linen Closet that I am really enjoying working with.  Hope she likes it as much as I do.


Monday, January 31, 2011

VALENTINE ROSES

Another Monday and a new week ahead.  I have some running to do for my Dad this week, so I got a few cards done today while I had the chance.  This one is a very simple card to do.  I cut out the heart and scallop frame from an SVG file, raised it with pop dots and applied it over a background with the paper roses on it.  I embossed the red paper with my Cuddelbug and put the two together.  
Eazy Peazy!


Saturday, January 29, 2011

WITH LOVE

Happy Saturday all, hope you are having a nice weekend!  I'm busy getting all my Valentine's done.  I wasn't  going to make a lot of them this year, but when I added up my list of people important to me I that I want to send a card to, I had a total of 15.  That's not too many, but enough to keep me busy for a few days!  I am not a "speedy" card maker, lol.  I got the layout for this card from one Gina K. used on one of her latest demos.  Her designs are right up my alley as they are clean, crisp and tailored.  You know I tend to lean in that direction!  ANYHOW, I cut the hearts from SVG files, colored the stamp with Copics, added some tiny rhinestones for a bit of glitz along with the ribbon.  The sentiment background was done with my Nestabilities and I added a couple little heart shaped brads.  Both the heart and the scallop oval are raised with pop dots.


Thursday, January 27, 2011

LOVE POSTAGE STAMP

I have a great friend who just loves my cards.  I invited her over to craft with me before Christmas and she really enjoyed it.  She says she has no talent for card making, but she is wrong!  She just needs some practice and confidence.  Today she and I worked on Valentine's.  What fun we had together laughing and crafting.  I had pre-cut all the pieces for us to make this card.  (She tends to get overwhelmed if she has to make too many choices, lol, so I make it as simple as I can for her.)  It is an SVG cut from MyScrapChick.com and was a dollar download called Heart and Love card, too adorable! It is a take on the postage stamp from some years ago.  This was my result, and hers was just as cute!  Great job Betsy, now we have to do Easter cards!!!


Sunday, January 23, 2011

PRETTY BIRDIE

I have been looking for some new stamps that are a more solid design so I could use the emboss resist technique.  I found this one of a cute bird at Micheal's in the dollar bin - how I love a good bargain!  I made this card for my cousin for her birthday and am very pleased with the results.  I used my Nestabilities for the shape the bird is stamped on, and did the stamp with Versamark and embossing powder.  Next I dabbed a combination of light and darker purple and a medium blue ink over the stamp with a sponge dauber.  I then added the ribbon, charm and the little roses.  The background paper is from Hobby Lobby, I love the colors and design.


Saturday, January 22, 2011

PICTURE FRAMES FOR THE LIME LIGHT

What FUN I am having making goodies for our latest project, and my first as a new Designer for The Lime Light!  Our team is making bookmarks, picture frames, cards, checkbook covers, note pads and various other hand made paper items for Parents Club Inc.  Be sure to visit The Lime Light and watch the video posted by Susan to learn all about this wonderful cause.  AND check out the other SUPER items our other Designers are making!!

I don't usually make New Year's resolutions, but this year I did.  I want try more and different types of paper crafting.  This is a perfect way to do it!  I have been working on these small picture frames for our first projcet.  I had never done them before and now I am in love with them!  They were so simple to do too.  I bought a pack of small frames from The Dollar Tree (they measure appx. 4 x 4 inches) They  were originally for a wedding photo.  I just covered them with my paper and added my own embellishments.


Tuesday, January 18, 2011

SPECIAL THANK YOU

Aloha all!  Today I received a very nice surprise.  I got a big envelope from my daughter's new mother-in-law with a beautiful 8 x 10 picture of the happy couple on their wedding day last June!  It is lovely, and easily the best picture that was taken that day.  I needed to send her a special thank you and I immediately knew what stamp I wanted to use.  I bought it a few weeks ago and have been waiting for just such an occasion to put it to work!  The paper is from a stack by "Colorbok" (not book!) and is a beautiful collection of black, white, grays and silver.  It was so nice to work with.  (Sure wish the silver butterflies on the paper showed up better in the picture.)  I added a little glitz by gluing tiny black rhinestones to the antennae of the butterflies on the ribbon and clear ones on the corners of the sentiment.  I love that stamp!  I used silver embossing powder on the black paper an love the way it looks.  Then a bit of silver cord to top it off.


Monday, January 17, 2011

COPIC CLASS

Yesterday was a VERY fun day!  I finally got to take a Copic class and became a Certified Copic Designer.  There was so much great information taught by a wonderful lady named Jennie Lin Eger-Black.  She made the class so enjoyable and really made the experience such a treat!  Mahalo Jennie!  If any of you have ever thought of taking a Copic class, I sincerely encourage you to do so.  Not only was all we learned in the class and the great supplies we received worth the cost, I met some great ladies and made some very helpful contacts.  Now all I have to do is practice, practice, practice!!!

Saturday, January 8, 2011

BOOKMARKS

I am so excited!  We received our first assignment from The Lime Light!  It is for Parents Club Inc. located in Oklahoma.  The CEO of the company is Barb Countz, a friend of one of our designers.  Barb runs a series of stores in southern Oklahoma to help people that need help! They are thrift stores that take in donated items... but if people are flat, and can't pay for what they need, she allows them to work at the rate of $8/hour, and then use that for clothes, shoes, etc. on items in the store.  She's quite strict about it, if they can't pay, they are not able to work for 'frivolous' things... just the necessities.  

We were asked to do all sorts of items such as birthday cards, magnetic picture frames, bookmarks, note pads, check book covers, grocery pads...  The store also gets a lot of regular customers, so these items are quite popular.  I am having so much fun making bookmarks!  I really enjoyed working with the beads, endless possibilities there.  My New Year's Resolution was to try new types of paper crafting and I am off and running!  I have never made them before so it has been great trying something new!  A friend of mine saw them today and wants to order some as gifts!


Tuesday, December 28, 2010

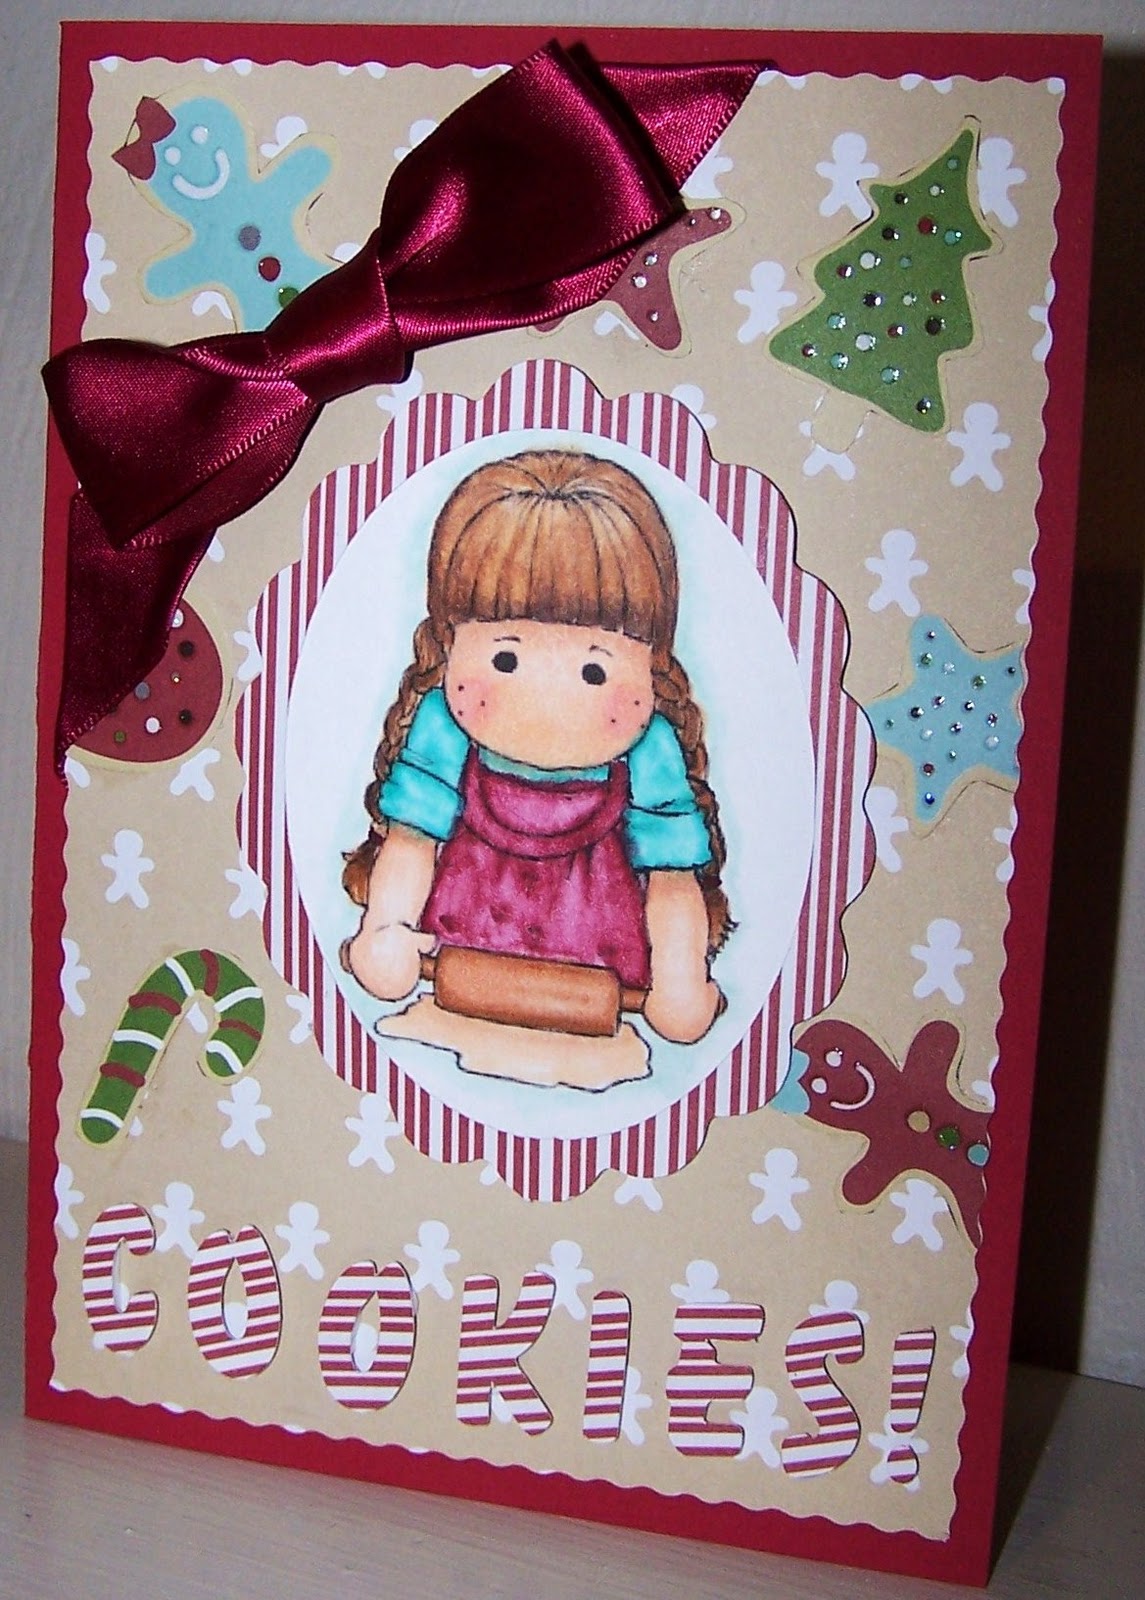
COOKIES!

I know that Christmas has come and gone, but I was still in the mood to do something "Christmasy" for fun!  I'm a bit behind with entering this for the challenge over at Magnolia-licous Highlites, but here it is.  The theme was letters.  I hadn't done a Tilda in a long time and had a lot of fun with this.  She is colored with Copics, the letters and scallop frame were cut with my Cricut, and the little cookie shapes I cut out by hand from some patterned paper and glued on.  Tilda and her frame and the letters are all raised with pop dots, then the finishing touch is the big bow.


Monday, December 27, 2010

WEDDING

A new year and a new beginning!  A January wedding is a wonderful way to celebrate!  This is for a BFF that is such a special friend and I wanted something fancy.  I was way out of my normal comfort zone on this one - lots of flowers and glitz.  But hey, like I said, a new beginning, so why not just jump into it and try something out of my normal realm!  The background paper was from Micheal's, Bride & Groom stamp is by Stampendous, little flowers from a prize package I won quite some time ago and hadn't yet used.  I added a bit of Stickles on the dots of her dress and added the silver ribbon.  The scallop circles were cut with my Cuttlebug using my Spellbinders and were raised with pop dots.  Let me know what you think - is it too overboard, lol?


The inside Congrats stamp and champagne flutes stamp I picked up from Micheal's dollar bin!


Tuesday, December 21, 2010

KIND THOUGHTS

This card is for a wonderful gentleman that visits my Dad. Yesterday he had surgery to insert a pace maker.  He and his wife are missionaries.  One afternoon my Dad was sitting outside in his wheel chair on the front porch and they stopped and spoke to him.  It's been 5 years since then and they have both become a blessing in my Dad's life.  As it was a card for a man, my mojo is always a bit slower!  So I looked through my pictures of card layouts and this one caught my eye - but I tweaked it a bit.  I had recently bought a paper stack by DCWV called "Linen Closet" that fit the bill perfectly.  Such nice soft hues of color.  I raised the two front layers with pop-dots, added a few dew drops and a bit of ribbon. The stamp was from Micheal's dollar bin (you know how much I love a bargain!)


Saturday, December 18, 2010

MAHALO NUI LOA! (Thank you very much!)

WOW!  What a WONDERFUL turnout we had for the The Lime Light Blog Hop!  Thank you so much to ALL of you who stopped by, became followers and left such LOVELY comments!  It warmed my heart to read all the great things you wrote, not only here, but on all the blogs involved.  They are a great and talented group!  Be sure to stay tuned for all the projects we will be working on this coming year.  It's sure to be a great adventure!  Again, Mahalo for all your support!  Joanne

Friday, December 17, 2010

LIME LIGHT CHARITABLE DESIGN TEAM BLOG HOP

As we say in Hawaii, "E KOMO MAI", which means welcome, come in!  I'm Joanne, and I am so happy to have you here and am so pleased to share The Lime Light with you.  I am a "newbie" on the team and it's my first time to be on a design team and am VERY excited!  I can't wait to see what wonderful projects we will be designing.  I am so honored to be in the company of such a great group of creative ladies.  If you arrived here from Sue's Cricut and Crafts amazing blog, you are on the right track.  If not, be sure to go back and start from the beginning at The Lime Light so you don't miss out on any of them!

On to the fun!  I have two lovely tropical themed note cards (pictured below) that are 5 x 7 and are blank on the inside. Please become a follower of my blog and leave a comment after this post to qualify to win these note cards or any of the other SUPER GOODIES that are being given away!


On this first card I used a fun technique.  On the brown paper background you can see a light colored design.  This was made with the  pineapple stamp stamped randomly all over the paper, BUT, I used a bleaching technique not ink!  Use a piece of darker paper for the best results.  Fold a paper towel  several times, then lay it on a ceramic or glass plate.  Pour just enough bleach on the paper towel to fully saturate it.  Use the paper towel as if it were your stamp pad to do your stamp.  Let the paper dry, or hurry it along by using your heat embossing tool.  VERY IMPORTANT - IMMEDIATELY WASH YOUR RUBBER STAMP WITH WARM SOAPY WATER!  The bleach can damage your stamp if you do not!  Try various types of paper for interesting results, I used plain brown construction paper.  It's fun to see the image suddenly start to appear as the bleach dries!  I then used a corner punch for the rounded edges and stamped the lighter paper with the pineapple stamp, taped the layers on the card and VOILA!


On the second card I used the same brown construction paper but no bleach technique.  I tore the edges by hand and did the same to the light colored paper with the stamp on it.  Then all I had to do was tape the layers on, very simple.


I hope you enjoyed your visit here as much as I have enjoyed you stopping by, come back again soon!  And be sure to keep up with all the great projects we will be doing on Lime Light.  Now on to the next wonderful designer who is one of our honored guests on this blog hop.  She has tons of ideas for your Cricut that are sure to excite and inspire you!  It's JOY at everyday Cricut.   ALOHA!

Tuesday, December 14, 2010

GIFT CARD HOLDER

Well, again I have to give a big MAHALO to my blogging buddy Christine for this wonderful idea.  She made several of these and they are beautiful!  I have one friend that I bought a gift card for, so I wanted to try making one.  It has a paper band that slides around the card to keep it closed so the gift card is more secure.  The ornament I drew and cut out by hand because the glitter paper was so thick my regular Cricut blade wouldn't cut it.  The ovals were cut with my Cuttle bug using Nestabilities.  I added the gold rhinestones and snowflakes which were all stick-ons ready made.  The colors are much prettier than in the pictures, I wish they showed up better!


Friday, December 10, 2010

WONDERFUL WHITE

This card is for a challenge over at Creative Inspirations.  The challenge is to use only white.  I used the Cuttle Bug and Swiss Dots folder for the background, cut the tree with my Cricut using a SCAL file with nice layers.  Used glitter for some bling, then added the ribbon for a final touch. Voila, simple and all white!